
Step 1: Apply for SEVP approved academy
As an international student, make sure you have chosen an institution that is accredited by the U.S. government's Student Visiting and Exchange Program (SEVP).
Accreditation is important because it ensures your degree is recognized by universities, professional associations, employers and government ministries around the world. Only SEVP-approved institutions can enroll students in the Student Information and Exchange System (SEVIS), which provides you with the necessary documents to apply for a U.S. student visa. Consult the government's Study in the U.S. website to identify accredited institutions.
Unlike some countries, the United States does not have a centralized college application system, so you will need to register with each school of interest separately. You will need to meet each institution's admissions requirements, and will normally also be required to demonstrate financial ability.
Once accepted, the university will enroll you in the SEVIS system and you will receive a SEVIS application called Form I-20 if you are eligible for an F or M visa, or Form DS-2019 if you are eligible for a J visa.
The SEVP manages international students under the F and M visa classifications, while the Department of Foreign Affairs (DoS) manages the International Student and Exchange Visitor Program under the J visa classification. Both SEVP and DoS use SEVIS to monitor and oversee institutes as well as international student and exchange programs.
Step 2: Pay SEVIS fee
You must pay the SEVIS fee at least three days before applying for a U.S. visa. To pay the fee, you will have to submit a form online or on paper, the latter two of which can be obtained from the U.S. Immigration and Customs Enforcement (ICE) SEVP website. Please enter the exact information as on the I-20 or DS-2019 form carefully.
At the time of this article, the I-901 fee is US$350 for F/M visa and US$220 for J student visa. Holders of J visa working as on-campus counselors, participating in international cultural exchange programs, or in work/summer tourism must pay $35.
The website explains the specific process for various payment methods including debit or credit cards, checks, international money orders, and Western Union express payments. After you have paid the fee, you can return to the website to check the payment status if you wish.
A third party (such as your sponsor) may also pay the fee, and if the fee is paid on your behalf by a third party, you will receive a receipt from this party.
You can obtain and print a payment confirmation from the website at any time after the payment has been processed, you will also need this confirmation as proof of payment of fees when interviewing for a US student visa. You may also be asked to present the confirmation to the customs officer at the US immigration area of your choice.
Step 3: Complete your US student visa application
Once you have received your SEVIS form and paid the SEVIS fee, you can make an appointment with the U.S. consulate or embassy in your country to apply for a U.S. student visa. Regardless of when your course starts, it is best to apply as soon as possible as visa processing times can vary. Your visa can be issued up to 120 days before you enter the U.S.
Most countries have their own website for everything needed to apply for a US student visa, which you can access by going to the main website. If you can't find your country on the list, you can still see the US embassy or consulate in your country when the US Embassy website.
Online visa application form: DS-160
In any case, you will need to complete the DS-160 online visa application form. You need to select where you want to apply and make sure all the necessary documents and information are in place to fill out the application. After selecting and answering the security question, you will be directed to the pages of the form. At the top, you will find the registration ID, which will be necessary to retrieve your form if you need to exit the application and come back later.
Information needed to complete the DS-160 form includes:
- Name and date of birth
- Address and phone number
- Passport Details
- Details of travel plans as well as travel companions
- Details of a previous trip to the US
- Your point of contact in the USA
- Family, work and education information
- Security, background and medical information
- SEVIS ID and the address of the school/program in the United States you plan to enroll in (as printed on the I-20 or DS-2019 form)
You also need to upload a recent matching photo of yourself in the required format. If the photo upload is unsuccessful, you will need to print a photo that meets the requirements for the visa interview.
Be careful to answer all questions correctly and fully as you may have to arrange a visa interview appointment again if there are any errors. If you are confused when filling out the form, you can find the answers to your questions on the Travel.state.gov website.
After completing the visa application form, you will need to electronically sign the DS-160 application by clicking on the “Sign the application” button at the bottom of the page. After the application is uploaded, you will receive a confirmation letter with the barcode, the barcode number and the posted ID number that will need to be printed out, and arrive at the visa interview appointment. You do not need to print out the entire application
Step 4: Pay the visa fee
The US student visa fee is also known as the MRV fee – machine-reading visa fee. Please ensure that you have read the full fee payment instructions available on the embassy or consulate website as the methods may vary.
However, there are generally three ways to pay the non-refundable, non-transferable visa application fee:
- Send directly to an approved bank
- By phone (you will receive a fee confirmation number)
- Online (you will need to print the receipt)
Do not worry if you encounter the term “compatibility-based visa fee” during your inquiry – this does not apply to F1, F2, M1, M2, J1 and J2 visa applicants.
You will be asked to invoice for the MRV fee when you arrive for your visa interview appointment. Some J visa applicants will not need to pay the application processing fee if participating in a U.S. Agency for International Development (USAID) program, a federally funded educational and cultural exchange program with program serial numbers starting from G-1, G-2, G- 3, or G-7.

Step 5: Arrange and attend a US student visa interview
The final step to obtaining a U.S. student visa is to arrange and attend a visa interview. You can do this online or by calling the nearest U.S. embassy or consulate. In both cases, it is advisable to complete the payment of the MRV fee in advance as you may need to provide your MRV fee amount.
The visa application process cannot be completed until you show up to interview the consular officer. Don't worry if you need to arrange an interview appointment at a U.S. embassy or consulate other than the one where you applied for your visa. The barcode from your DS-160 can be used to obtain information at any U.S. embassy or consulate. However, be aware that it can be a bit difficult to obtain a visa if you apply outside of your permanent residence. Wait times for visa interview appointments vary by location, season, and visa type.
Interview step 5 in the steps of applying for VISA to study in the US
What do you need for a student visa interview?
Check the website of the embassy or consulate where you will be applying to make sure you have all the necessary documents for your interview. These documents may include:
- Passports are valid for at least six months after your stay in the U.S. If more than one person is included in your passport, each person who needs a visa must apply separately. You may also need to bring all your current and old passports.
- Signed Form SEVIS I-20 or DS-2019 (including separate forms for spouses/children)
- Form DS-7002 (only for J-1 Trainee and Intern visa applicants)
- SEVIS Fee Receipt
- DS-160 Application Confirmation Page with Barcode and Application ID Number
- Receipt confirming payment of MRV fee
- Printed letter of visa interview appointment
- 1-2 photos in the format explained in the photo requirements. It is recommended to print on photo-quality paper.
You should also prepare the following documents:
- Transcripts and diplomas of previous institutes involved
- Results of standardized tests required by educational institutions such as TOEFL, LSAT, GRE, GMAT, etc.
- Evidence that the financial ability or sponsor (i.e. parent or government sponsor) has sufficient funds to cover tuition, transportation, and living expenses during their time in the US.
You can also bring along a list of separate documents from all employers and schools that you have worked or attended for reference.
Documents that arise should be brought with you:
- Copy of marriage certificate, birth certificate to prove relationship
- A copy of the visa of the primary visa applicant (i.e. F-1, M-1, J-1) or official document from USCIS confirming the status of the primary applicant.
- A copy of the personal data page from the passport of the applicant.
Attend an interview for a US student visa
It's important to be on time for your visa interview – late applicants may be asked to reschedule for another day. In most cases, only applicants with an appointment will be brought inside the U.S. embassy or consulate. For exceptions that include parents for children under 18, translators and assistants for people with disabilities – you will need to contact the embassy or consulate of your choice to provide the names of the parents, translators or assistants who will accompany you.
The purpose of the visa interview is for the consular officer to determine if you are eligible to receive a US student visa, and if so, what type of visa is right for you. Be ready to answer questions regarding your country, English skills, education level, the program in the United States you have been accepted to, and proof of your financial ability. You may also be asked to explain your plans upon completion of your studies.
Ink-free digital fingerprint scanning will be done as part of the visa application process, which usually happens at your visa interview
After the interview, the consular officer will let you know if your application requires further administrative processing – this may mean that you need more time to wait for your visa. The waiting time will vary depending on the country. You will also be notified how and when your passport with visa will be returned (usually received or delivered by courier). In some countries, the courier company will send an email with a tracking number that you can use to track the delivery of your passport.
F-1 and M-1 visas can be issued 120 days in advance of the start date, but you will not be allowed to enter the U.S. earlier than 30 days before the start date. J-1 visas can be issued at any time. If you want to enter the U.S. before this 30 days, you must qualify and obtain a visitor visa. The 30 day limit does not apply to students returning to continue their studies – they can enter the U.S. at any time, as long as they have a valid visa.
Use your visa
Since there are no guarantees, do not make a final travel plan or buy tickets until you have a visa. Note that a valid visa does not guarantee entry into the United States: it only allows you to go to the port of entry and requires permission to enter the United States. An entry permit is issued by an official of the U.S. Department of Homeland Security's Customs and Border Protection (CBP) Department.
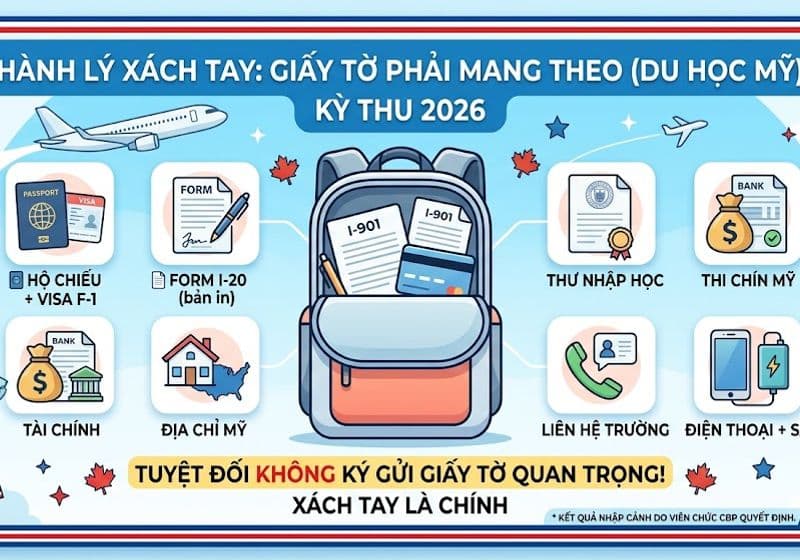
Always carry visa-related documents in your carry-on baggage as you will likely have to present them at your port of entry. Documents you should keep with you include:
Passport
- Model SEVIS I-20 or DS-2019
- Evidence of financial capacity
- Evidence of student status (such as recent tuition receipts and transcripts)
- Name and contact information for your Designated School Officer (DSO), including the 24-hour emergency contact number at your chosen facility.
- If you are an exchange student: a letter from the university in your country stating your intention to return to the university.
- You must have a Form I-20 / DS-2019 every time you enter the United States – if you are on vacation outside of the United States, you will need a SEVIS form to re-enter the country.
Step 6: Arrive in the USA

If you arrive in the United States by plane, you will need to fill out a customs declaration form (CF-6059) before landing. You can ask an airline attendant for help if you do not understand the form. You also need to fill out Form I-94 / Departure Notes online or on paper. Your U.S. student visa is valid until the date on your visa. CBP staff will record a separate date or “D/S” (validity period) on your Form I-94.
This is the date on which you must leave the United States. You can stay in the United States until this date even if your visa expires during your stay. However, if you leave the United States with an expired visa, you will need to obtain a new one before you can return and continue your studies. A student visa cannot be extended or re-issued in the United States; it must be made at a U.S. embassy or consulate abroad.
If you are issued with an I-94 form, the date will be noted on the paper. If you are issued with an electronic I-94, the CBP officer will provide an admission stamp on your passport as proof for the electronic I-94 and write a D/S on the stamp.
If you are issued a paper I-94 form, make sure to keep it safe in your passport as you will have to return it to the CBP officer when you leave the United States. If there is an electronic I-94, a CBP official will instead record your departure using clear information obtained from the airline or sea route you are traveling.
As it appears on the SEVIS I-20/DS-2019 form, you should notify the office responsible for supporting international students at the academy within 30 days of the start of your course as such. This could be the Office of International Services, the Office of International Education, the Office of International Programs or the like. A designated officer (DSO) will confirm your intended participation by confirming your arrival on the SEVIS system. This must be done within 30 days or your application for SEVIS will automatically terminate and you may be deemed to have violated your status in the US.
The DSO will also be happy to advise you on matters such as insurance. Since the United States does not have a social health care system, proving that you have purchased private health insurance to pay for your medical treatment is a mandatory requirement for admission.
Step 7: Depart from USA
F-1 visa holders can stay in the U.S. for an additional 60 days after completing the course, whereas M-1 and J-1 visas can only remain for an additional 30 days after completing the course. This is called the “regret period” which allows applicants to prepare for their departure from the U.S. All students must depart before the date on their I-94 form/stamp. Failure to leave the U.S. will deprive you of your status and staying in the U.S. without status is a violation of immigration laws and may make you ineligible for a visa in the future. If you want to extend your stay, you will need approval from USCIS. If you continue to be a student, you can extend your visa at any time, provided you maintain your student status and have a current SEVIS application.
Please contact us
Greatlink International Consulting and DT Company
Hotline: 0936.77.33.86/0868.81.79.81
Email: [email protected] or [email protected]
website: greatlink.edu.vn
https://www.facebook.com/GreatlinkInternational